
This recipe creates a classic summer dessert featuring juicy peaches and a golden, buttery biscuit topping. It is specifically formulated to be gluten-free without sacrificing the traditional tender crumb.
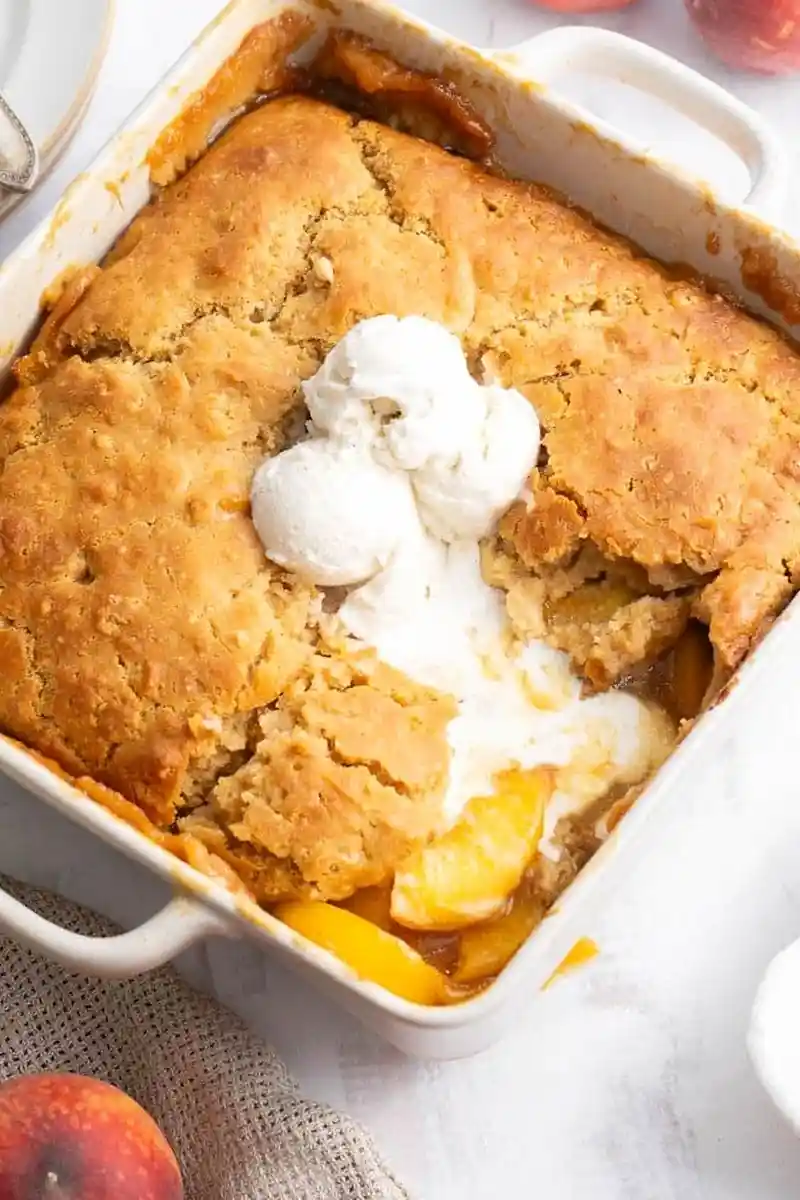
List of ingredients
- 4 pounds fresh peaches – peeled and sliced 1/4-inch thick for consistent cooking.
- 1/3 cup brown sugar – adds a deep caramel sweetness to the fruit.
- 1 Tablespoon lemon juice – provides acidity to balance the sugar.
- 1 1/2 Tablespoons cornstarch – acts as a thickener for the peach juices.
- 1 teaspoon vanilla extract – enhances the overall flavor profile.
- 1 teaspoon ground ginger – adds a subtle, warm spice.
- 1/2 teaspoon ground nutmeg – complements the peach flavor.
- 1/4 teaspoon kosher salt – enhances all other flavors.
- 1 1/2 cup 1:1 gluten-free flour – must include xanthan gum for structure.
- 1/3 cup brown sugar – provides sweetness and color to the topping.
- 2 teaspoons baking powder – helps the biscuits rise.
- 1/2 teaspoon baking soda – reacts with buttermilk for lift.
- 1/2 teaspoon salt – seasons the dough.
- 1/2 teaspoon ground ginger – carries the warmth into the crust.
- 6 Tablespoons unsalted butter – must be cold and cubed for flakiness.
- 3/4 cup buttermilk – must be cold to ensure a proper rise.
step-by-step instructions
- Prepare Oven and Pan: Preheat your oven to 350 F degrees. Lightly butter or oil your baking dish to prevent sticking.
- Mix Peach Filling: In a large bowl, combine the peaches, brown sugar, cornstarch, and spices. Toss until the peaches are evenly coated, then transfer the mixture to the prepared baking dish.
- Combine Dry Topping Ingredients: Whisk the flour, sugar, baking powder, baking soda, salt, and ginger together in a large bowl. Use two forks or a pastry cutter to cut in the cold butter until the mixture has pea-sized crumbs.
- Incorporate Wet Ingredients: Whisk together one egg yolk and the cold buttermilk. Slowly add this mixture to the flour and stir with a rubber spatula until just combined. Let the dough rest for 10 minutes.
- Assemble the Cobbler: Spoon the dough over the peach filling. Leave some gaps so the filling shows through and steam can escape. Optionally, brush the top with a whisked egg and a little water.
- Bake and Cool: Bake uncovered until the fruit bubbles and the top is golden brown, typically 40 to 55 minutes. Cover loosely with foil if the top browns too quickly. Cool for 10 to 15 minutes before serving.
Selecting and Preparing the Best Peaches
Choosing the Right Ripeness
Select peaches that are firm but give slightly when pressed near the stem. Overripe peaches turn to mush during baking, while underripe fruit lacks the necessary sweetness and juice. Ensure the skin is vibrant and free of deep bruises.
Blanching Peaches for Effortless Peeling
Bring a pot of water to a boil and drop peaches in for exactly 30 seconds. Immediately plunge them into a bowl of ice water to stop the cooking process. This technique loosens the skin, allowing it to slide off without damaging the fruit’s flesh.
Preparing Frozen Peaches as a Substitute
If using frozen unsweetened peaches, thaw them completely before using. Chop them into 1/4-inch slices and blot them thoroughly with paper towels to remove excess moisture. This prevents the filling from becoming too watery.
Why Canned Peaches Should Be Avoided
Canned peaches are processed in syrup and have a much softer texture than fresh or frozen fruit. They lack the structural integrity required to hold their shape during the long baking process. This usually results in a jam-like consistency rather than distinct fruit slices.
Optimizing Gluten-Free Baking Results
Using 1:1 Gluten-Free Flour Blends
Ensure you use a blend specifically labeled as 1:1 or measure-for-measure. These blends are engineered to mimic wheat flour in a variety of applications. This ensures the biscuit topping has the correct density and crumb.
The Importance of Xanthan Gum
Xanthan gum acts as the binding agent that replaces gluten in this recipe. It provides the elasticity needed to hold the air bubbles created by the leavening agents. If your flour blend does not include it, you must add it separately to prevent a crumbly topping.
Cornstarch for Filling Consistency
Peaches release a significant amount of liquid as they heat up in the oven. Cornstarch binds this liquid into a thick, glossy sauce. Without enough thickener, the bottom of the cobbler will be soupy and the crust may become soggy.
Alternative Thickeners for the Filling
Arrowroot powder or tapioca starch can be used as direct substitutes for cornstarch. These alternatives provide a similar thickening effect and maintain a clear appearance. Use them in the same quantity as the cornstarch listed in the recipe.
Perfecting the Biscuit Topping
Maintaining Cold Temperatures for Butter
Keep the butter in the refrigerator until the moment you are ready to cut it into the flour. Cold butter creates small pockets of fat that steam during baking. This process is what creates the characteristic flaky layers in the biscuit topping.
Using a Pastry Cutter for Texture
Use a pastry cutter or two forks to incorporate the butter into the dry ingredients. The goal is to leave pea-sized lumps of butter intact. If the butter melts into the flour, the topping will be dense rather than light and airy.
Preventing Overmixing of the Dough
Stir the buttermilk and egg mixture into the flour only until the ingredients are just combined. Overworking the dough can lead to a tough texture. A few lumps in the dough are acceptable and contribute to a rustic finish.
The Benefit of Resting the Dough
Allowing the dough to sit for 10 minutes before spooning it onto the peaches allows the gluten-free flour to fully hydrate. This step improves the overall texture of the baked biscuit. It also helps the leavening agents begin their reaction.
The Role of Buttermilk and Baking Soda
The acidity in buttermilk reacts with the baking soda to produce carbon dioxide gas. This chemical reaction creates the lift and puffiness in the topping. Using cold buttermilk ensures this reaction happens primarily in the oven for maximum height.
Baking and Finishing Techniques
Managing Oven Temperature with Foil
Check the cobbler halfway through the baking time to see if the topping is browning too quickly. If the top is dark but the fruit isn’t bubbling, cover the dish loosely with aluminum foil. This protects the crust while allowing the filling to finish cooking.
Identifying Correct Doneness
The cobbler is finished when the fruit filling is bubbling vigorously around the edges. The topping should be a light golden brown and feel firm to the touch. You can insert a toothpick into the crust to ensure there is no raw batter.
Selecting the Optimal Baking Dish
A 9×9 inch baking dish is recommended for the best ratio of fruit to topping. Using a smaller, deeper dish will result in a thicker layer of peaches. Be aware that deeper dishes may require a few extra minutes of baking time.
Allowing Steam to Escape
Do not cover the entire surface of the peaches with dough. Leaving small gaps allows steam to vent from the filling. This prevents the dough from becoming soggy on the bottom and creates a more visually appealing dessert.
Serving and Pairing Suggestions
Choosing the Ideal Dairy Accompaniment
Warm peach cobbler pairs best with a cold, creamy element to balance the heat. Vanilla ice cream is a traditional choice that adds a rich, milky flavor. Alternatively, freshly whipped cream with a touch of honey provides a lighter contrast.
Serving Temperature and Timing
Serve the cobbler warm, but allow it to rest for 10 to 15 minutes after leaving the oven. This resting period allows the thickened peach juices to set. Serving it immediately can result in the filling running too much on the plate.
Storage and Reheating Instructions
Proper Refrigeration Methods
Cover the baking dish tightly with plastic wrap or aluminum foil once the cobbler has cooled completely. Alternatively, transfer leftovers to an airtight container. Store the cobbler in the refrigerator for up to four days.
Reheating for Best Texture
To maintain the crispness of the topping, reheat the cobbler in the oven at 300 F degrees. Warm it for 20 to 30 minutes until heated through. Avoid the microwave, as it can make the biscuit topping rubbery.
Freezing the Peach Filling
While the assembled cobbler should not be frozen, you can freeze the prepared peach filling for up to three months. Thaw the filling completely before adding the fresh topping. Add an extra teaspoon of cornstarch after thawing to compensate for any liquid loss.
Troubleshooting Common Issues
Fixing a Soupy Filling
If the filling is too watery, it is usually due to overripe fruit or a lack of thickener. In future batches, increase the cornstarch by a half-tablespoon. For current leftovers, you can simmer the filling in a saucepan to reduce the liquid before serving.
Addressing a Dense Topping
A heavy, non-flaky topping usually happens if the butter was too warm or the dough was overmixed. Ensure butter is cubed and chilled before adding it to the flour. Use a light touch when stirring in the buttermilk.
Correcting a Pale Crust
If the topping remains pale after the filling is cooked, you can turn on the broiler for one to two minutes. Watch the oven closely to prevent burning. Using an egg wash before baking also helps achieve a deep golden color.
Frequently Asked Questions
Can I use a different type of sugar?
Brown sugar is recommended for its molasses flavor, but granulated white sugar can be used. Be aware that white sugar will result in a lighter-colored crust and a cleaner, less caramel-like sweetness in the filling.
Why is the topping not browning?
This can happen if the oven temperature is too low or if the topping is too moist. Ensure your oven is fully preheated to 350 F. Applying an egg wash to the top of the dough is the most effective way to guarantee a golden finish.
How do I prevent the fruit from mushing?
Avoid using canned peaches and ensure you do not overcook the cobbler. Slicing the peaches into consistent 1/4-inch pieces ensures they cook evenly. Once the fruit is bubbling and the crust is brown, remove it from the oven immediately.
Print
Old Fashioned Gluten-Free Peach Cobbler
- Total Time: 70 minutes
- Yield: 8 servings
- Diet: Gluten-Free
Description
The best peach cobbler made gluten-free with a delicious brown sugar peach filling and an old-fashioned buttery biscuit topping.
Ingredients
- 4 pounds fresh peaches, peeled and sliced ¼-inch thick
- ⅓ cup brown sugar
- 1 Tablespoon lemon juice
- 1½ Tablespoons cornstarch
- 1 teaspoon vanilla extract
- 1 teaspoon ground ginger
- ½ teaspoon ground nutmeg
- ¼ teaspoon kosher salt
- 1 ½ cup 1:1 gluten-free flour with xanthan gum
- ⅓ cup brown sugar
- 2 teaspoons baking powder
- ½ teaspoon baking soda
- ½ teaspoon salt
- ½ teaspoon ground ginger
- 6 Tablespoons unsalted butter, cold and cubed
- ¾ cup buttermilk, cold
- 1 egg yolk
Instructions
- Preheat: Preheat your oven to 350 F degrees. Lightly butter or oil your baking dish.
- Prepare Filling: In a large bowl, combine the peaches, brown sugar, cornstarch, and spices. Toss until the peaches are evenly coated. Transfer the mixture to the prepared baking dish. If your dish is deep enough you can also just mix directly in the pan.
- Mix Dry Topping: Whisk the flour, sugar, baking powder, baking soda, salt, and ginger together in a large bowl. Using two forks (or a pastry cutter) cut in the butter until you have pea sized crumbs.
- Combine Wet Topping: Whisk together the egg yolk and buttermilk. Slowly add the mixture to the flour and stir with a rubber spatula until evenly combined. Rest the dough for 10 minutes.
- Assemble: Spoon the dough all over the top of the peach filling. The filling should be mainly covered with some of the filling showing through. Optional Eggwash: Brush the top with an extra whisked egg with a little water.
- Bake: Bake uncovered until the fruit is bubbling and the top is golden brown, about 40 to 55 minutes. If it looks like it’s getting too brown, cover it loosely with aluminum foil. Cool for 10 to 15 minutes before serving.
Notes
Use fresh peaches if possible. If using frozen unsweetened peaches, thaw, chop, and blot them dry first. Avoid canned peaches as they tend to be too soft. Keep butter and buttermilk cold until the last minute for the best rise.
- Prep Time: 20 minutes
- Cook Time: 50 minutes
- Category: Dessert
- Method: Baking
- Cuisine: American
Nutrition
- Serving Size: 1 serving
- Calories: 319 kcal
- Sugar: 28 g
- Sodium: 310 mg
- Fat: 11 g
- Saturated Fat: 6 g
- Unsaturated Fat: 5 g
- Trans Fat: 0 g
- Carbohydrates: 56 g
- Fiber: 4 g
- Protein: 4 g
- Cholesterol: 62 mg