
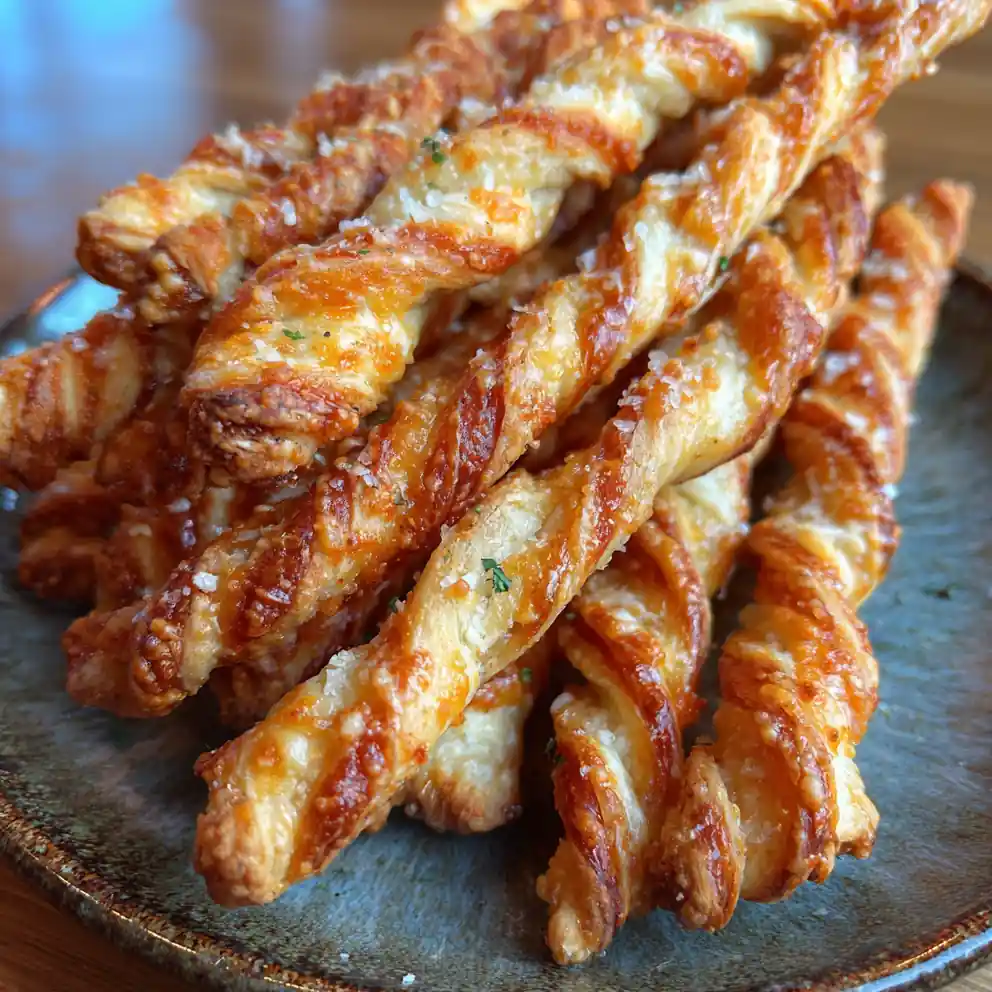
I’m always looking for simple, satisfying snacks that feel a little special, and this cheese straw recipe with paprika dusting hits all the right notes. The aroma of warm cheese and smoky paprika filling my kitchen is pure comfort. It’s a truly family-friendly recipe, perfect for busy evenings or when you need an easy appetizer. Forget store-bought; this homemade approach delivers superior crispness, fresh flavor, and an irresistible paprika kick.
Ingredient Essentials & Flavor Roles
Crafting delicious, homemade treats like this cheese straw recipe starts with quality ingredients. Each component plays a vital role in achieving that perfect savory crunch and depth of flavor.
- All-Purpose Flour: 1 ½ cups (180g) – Provides the essential structure.
- Cold Unsalted Butter: ¾ cup (170g), cut into small cubes – Crucial for flakiness. (I always use organic butter for a richer taste.)
- Sharp Cheddar Cheese: 1 cup (113g), finely shredded – The main cheesy, tangy flavor. (Swap with Gruyere for a nutty depth).
- Parmesan Cheese: ½ cup (50g), finely grated – Adds umami and a salty kick.
- Smoked Paprika: 1 teaspoon – Delivers smoky sweetness and vibrant color. (Sweet paprika works too if you prefer a milder flavor.)
- Cayenne Pepper: ¼ teaspoon – A subtle warmth, easily adjusted.
- Fine Sea Salt: ½ teaspoon – Enhances all flavors.
- Ice Water: 1-2 tablespoons, as needed – Helps bring the dough together without overworking.
For a deeper, richer taste, I recommend a high-quality aged cheddar. These premium choices truly elevate the simple cheese straw recipe. For those with dietary needs, a gluten-free flour blend works beautifully, or use dairy-free butter and cheese alternatives.
Easy Preparation Steps
Making homemade cheese straws is surprisingly simple, making them a fantastic addition to your collection of easy dinner ideas or high-protein snacks. Follow these steps for perfect results every time:
- Combine Dry Ingredients: In a large bowl, whisk together 1 ½ cups all-purpose flour, ½ teaspoon salt, 1 teaspoon smoked paprika, and ¼ teaspoon cayenne pepper until well combined. The mixture should smell faintly spicy and aromatic.
- Cut in Butter: Add ¾ cup cold unsalted butter, cut into small cubes. Use a pastry blender or your fingertips to cut the butter into the flour until the mixture resembles coarse crumbs, with some pea-sized butter pieces remaining. Keep it crumbly, not smooth.
- Add Cheese: Stir in 1 cup finely shredded sharp cheddar cheese and ½ cup finely grated Parmesan cheese until evenly distributed.
- Form the Dough: Add 1-2 tablespoons of ice water, one tablespoon at a time, mixing just until the dough comes together. If it looks dry, splash in 1–2 Tbsp more water, a half tablespoon at a time. Do not overmix; the dough should just hold its shape, not be sticky.
- Chill the Dough: Gather the dough into a disk, wrap it tightly in plastic wrap, and chill in the refrigerator for at least 30 minutes, or up to 2 days. This step is crucial for firm dough and tender, flaky cheese straws.
- Roll and Cut: On a lightly floured surface, roll the chilled dough to an even 1/8-inch thickness. Use a ruler and a sharp knife or pastry wheel to cut into ½-inch wide strips. I find a large 10-inch sheet pan is perfect for arranging the strips without crowding.
- Bake: Arrange the strips on a parchment-lined baking sheet, leaving a little space between each. Bake in a preheated oven at 375°F (190°C) for 12-15 minutes, or until golden brown and crispy at the edges. The kitchen will smell wonderfully cheesy!
For a healthier twist, consider using whole wheat pastry flour for added fiber, or reduce the salt slightly. I often make a double batch of this cheese straw recipe on Sunday afternoons for quick, high-protein snacks throughout the week; my kids can’t get enough, and it makes for easy meal prep. To ensure tender straws, avoid overworking the dough, and always aim for an even thickness when rolling for consistent baking results.
Perfect Occasions and Storage
This delightful cheese straw recipe with paprika dusting is incredibly versatile, fitting seamlessly into various moments, from everyday snacking to special celebrations.
- Everyday uses: Enjoy them as a quick after-school snack, a crunchy addition to lunchboxes, or a flavorful accompaniment to your favorite soups and salads.
- Celebrations and special events: Elevate holiday platters, game day spreads, or potlucks with these savory, crispy bites.
For convenience, store baked cheese straws in an airtight container at room temperature for up to 5 days. For meal prep, unbaked dough can be wrapped tightly and refrigerated for up to 2 days, or frozen for up to 1 month. Baked straws freeze well for up to 3 months; gently reheat for crispness.
Nutrition & Everyday Benefits of Cheese Straws
Our easy cheese straw recipe with paprika dusting offers a satisfying and flavorful snack that can help curb cravings, providing a delicious balance of carbohydrates and protein. They are excellent for quick meal prep snacks, a weight-friendly treat in moderation, or a delightful protein-packed bite.
Consider them a fantastic healthy meal idea when paired with a light soup, an easy family dinner side, or one of the best high-protein snacks for cheese lovers. This recipe fits well into quick meal prep tips for batch baking.
How This Recipe Saves Time & Money
Utilizing common pantry staples, this cheese straw recipe with paprika dusting is a budget-friendly option compared to specialty store-bought snacks. The dough can be made ahead, saving precious minutes on busy weeknights, and you can batch bake multiple trays efficiently.
Minimal cleanup, especially with parchment paper, allows more time for family. It’s also a great way to use up leftover cheese odds and ends from your fridge.
Expert Tips and Adjustments
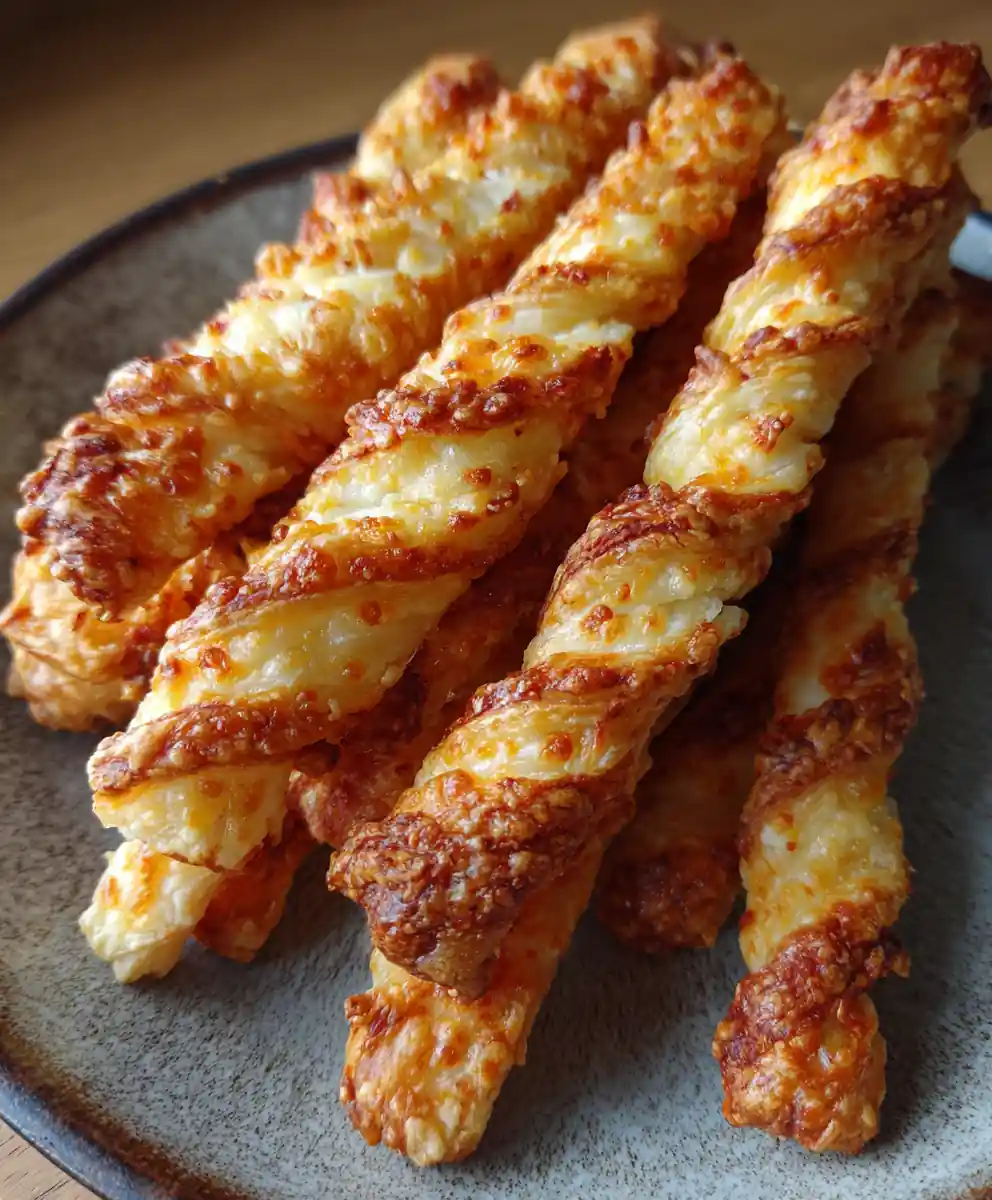
For uniform straws, I often use a ruler and a sharp knife on my kitchen counter. You can also brush the strips with an egg wash before baking for an extra golden sheen and a slightly richer crust.
Adjust seasoning to your preference: add more cayenne for extra heat, or omit it for a milder flavor. Experiment with smoked paprika for a deeper, earthier note, or stick with sweet paprika for classic color. For my kids, I always skip the cayenne to keep them happy!
For allergy-friendly or diet-based modifications, substitute with a gluten-free flour blend. For dairy-free versions, use plant-based butter and your favorite hard cheese alternative.
Common Questions Answered
Can this cheese straw recipe fit into a meal prep plan?
Absolutely! The dough can be made ahead and chilled, saving time on baking day. Baked straws are also great for grab-and-go meal prep throughout the week.
What are the best substitutes for cheese in a cheese straw recipe?
For dairy-free needs, combine nutritional yeast with a plant-based hard cheese alternative. For flavor variety, Gruyere, Asiago, or even a sharp provolone can replace cheddar beautifully in this cheese straw recipe with paprika dusting.
Can I freeze these cheese straws?
Yes, both unbaked dough strips and baked straws freeze exceptionally well. Freeze cut, unbaked strips on a sheet pan before transferring to a freezer bag; bake from frozen, adding a few extra minutes.
What kind of paprika should I use for this cheese straw recipe?
Sweet paprika provides vibrant color and mild flavor. I personally prefer smoked paprika for its wonderful depth, but hot paprika is great if you enjoy a spicier kick.
Are these cheese straws suitable for kids?
Absolutely! Simply reduce or omit the cayenne pepper for a milder, kid-friendly snack. Kids adore the cheesy, crispy texture of this cheese straw recipe.
Why are my cheese straws not crispy?
Lack of crispness often stems from overworking the dough, rolling it too thick, or not baking long enough. Ensure your butter is very cold and bake until the straws are deeply golden and firm.
What do you serve with cheese straws?
These versatile treats are wonderful on their own or paired with a creamy dip, tomato soup, or a fresh green salad for a simple family dinner.
Conclusion
This easy cheese straw recipe with paprika dusting is a simple, satisfying, and incredibly delicious way to elevate your snack game. I know my family loves having these ready for school lunches or a quick savory bite. Don’t wait! Pin this recipe for healthy eating and quick meals, or share the cheesy goodness with friends and family.
Print
cheese straw recipe With Paprika Dusting
- Total Time: 70 minutes
- Yield: 30 cheese straws
- Diet: General
Description
This cheese straw recipe creates a simple, satisfying snack with a superior crispness, fresh flavor, and an irresistible paprika kick, perfect for family evenings or as an easy appetizer.
Ingredients
- 1.5 cups all-purpose flour (180 g)
- 0.75 cup cold unsalted butter, cut into small cubes (170 g)
- 1 cup sharp cheddar cheese, finely shredded (113 g)
- 0.5 cup Parmesan cheese, finely grated (50 g)
- 1 teaspoon smoked paprika
- 0.25 teaspoon cayenne pepper
- 0.5 teaspoon fine sea salt
- 1–2 tablespoons ice water, as needed
Instructions
- Combine Dry Ingredients: In a large bowl, whisk together the all-purpose flour, salt, smoked paprika, and cayenne pepper until well combined and aromatic.
- Cut In Butter: Add the cold unsalted butter, cut into small cubes. Use a pastry blender or your fingertips to cut the butter into the flour until the mixture resembles coarse crumbs, with some pea-sized butter pieces remaining.
- Add Cheese: Stir in the finely shredded sharp cheddar cheese and finely grated Parmesan cheese until evenly distributed.
- Form The Dough: Add 1-2 tablespoons of ice water, one tablespoon at a time, mixing just until the dough comes together. Do not overmix; the dough should just hold its shape, not be sticky.
- Chill The Dough: Gather the dough into a disk, wrap it tightly in plastic wrap, and chill in the refrigerator for at least 30 minutes, or up to 2 days, to ensure firm dough and tender, flaky cheese straws.
- Roll And Cut: On a lightly floured surface, roll the chilled dough to an even 0.125-inch thickness. Use a ruler and a sharp knife or pastry wheel to cut into 0.5-inch wide strips.
- Bake: Arrange the strips on a parchment-lined baking sheet, leaving a little space between each. Bake in a preheated oven at 375 degrees F (190 degrees C) for 12-15 minutes, or until golden brown and crispy at the edges.
Notes
For a deeper flavor, use high-quality aged cheddar; Gruyere can be swapped for a nutty depth. Sweet paprika can replace smoked paprika for a milder flavor. Avoid overworking the dough to ensure tender straws and roll to an even thickness for consistent baking. Gluten-free flour blends and dairy-free alternatives can be used for dietary needs. Chilling the dough is crucial for firm dough and tender, flaky cheese straws.
- Prep Time: 55 minutes
- Cook Time: 15 minutes
- Category: Snack
- Method: Baking
- Cuisine: American
Nutrition
- Serving Size: 3 cheese straws (55 g)
- Calories: 180 calories
- Sugar: 0 g
- Sodium: 250 mg
- Fat: 14 g
- Saturated Fat: 8 g
- Unsaturated Fat: 6 g
- Trans Fat: 0 g
- Carbohydrates: 12 g
- Fiber: 1 g
- Protein: 6 g
- Cholesterol: 40 mg
FREE PRINTABLE RECIPE
Get the Printable Recipe PDF (Free)
Enter your email and we’ll send you the ingredients + step-by-step instructions as a clean PDF you can save to your phone.
- ✅ Printable PDF (ingredients + steps)
- ✅ Save it to your phone (no long scrolling)
- ✅ Includes cook time + servings
- ✅ Easy to follow
FAQ
Where’s the full recipe?
It’s delivered as a printable PDF so you can save it and cook without scrolling.
I didn’t get the email.
Check Spam/Promotions and search your inbox for your site name. Then click Confirm to receive the PDF.