
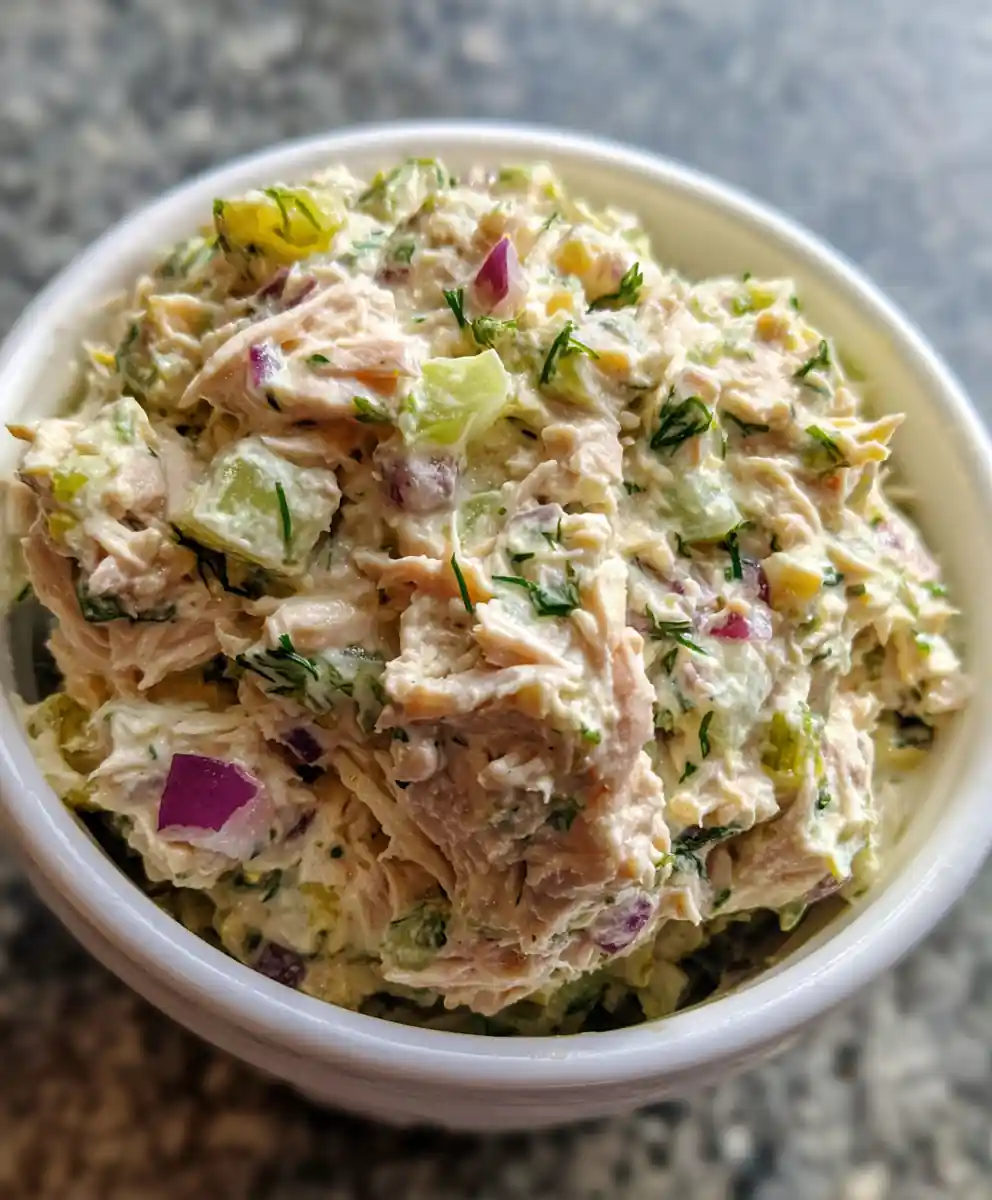
I often find myself craving that distinct, fresh deli flavor, especially when I need a quick lunch at home. This easy subway tuna recipe Bright Dill Relish delivers that satisfying creamy texture and a zesty tang I adore. It’s truly a homemade hero for those busy weekdays. Perfect for busy parents needing a quick, hearty lunch or anyone looking for a satisfying, budget-friendly meal. For my family, I always make a double batch on Sunday, so we have high-protein snacks and quick lunches ready for the school week. We’ll dive into smart ingredient choices and practical benefits for your family-friendly kitchen.

Ingredient Spotlight and Smart Choices
Here’s what you’ll need for your delicious, easy subway tuna recipe Bright Dill Relish, ensuring a hearty, healthy meal every time.
- Canned Tuna (2x 5-oz/142g cans, packed in water, drained): The lean protein powerhouse. (Try sustainably sourced albacore for richer flavor, or chunk light for classic texture.)
- Mayonnaise (1/2 cup/120g): For ultimate creaminess and binding. (I often use avocado oil mayo for a healthy fat option, or Greek yogurt for a lighter, tangy twist.)
- Celery (2 stalks, finely chopped, ~1/2 cup/60g): Adds essential crunch and a refreshing taste.
- Red Onion (1/4 small, finely diced, ~1/4 cup/30g): Provides subtle sharpness. (Finely diced bell pepper is a great mild alternative.)
- Bright Dill Relish (1/4 cup/60g): The star for that signature tangy, fresh flavor in this subway tuna recipe Bright Dill Relish.
- Salt (1/4 tsp, or to taste): Enhances all flavors.
- Black Pepper (1/8 tsp, freshly ground, or to taste): Adds a touch of warmth.
Upgraded Versions and Swaps
Elevate your classic flavors with these simple ingredient variations:
- Sustainably Sourced Tuna: A more conscious, healthy choice.
- Avocado Oil Mayo: Offers healthy fats and a clean taste.
- Fresh Dill: Adds vibrant, aromatic flavor.
- Dairy-Free Mayo: An easy swap for dietary needs.
- Greek Yogurt: High-protein, lighter option instead of some mayo.
- Finely Diced Bell Pepper: Milder than onion for a sweeter crunch.
Freshness & Flavor Tips
Achieve the best flavor for your subway tuna recipe Bright Dill Relish with these key tips:
- Crisp Celery: Select firm, vibrant green stalks for best crunch.
- Fresh Dill: Use fresh dill for brighter, more potent notes.
- Relish Dates: Check relish expiration dates for optimal tang.
- Quality Tuna: Choose high-quality canned tuna for the best flavor foundation.
- Drain Tuna Well: Squeeze out excess liquid to prevent a watery salad.
- Taste & Adjust: Season to taste before serving; adjust salt, pepper, or relish.
Clear Step-by-Step Instructions
Creating your homemade subway tuna recipe Bright Dill Relish is incredibly simple. Follow these steps for a delicious, family-friendly meal:
- Drain Tuna (5 minutes): Thoroughly drain the canned tuna using a fine-mesh sieve or by pressing the lid against the can. Ensure it’s quite dry to the touch. Flake the drained tuna into a medium mixing bowl with a fork, breaking up any large chunks.
- Prep Veggies (5-7 minutes): Finely chop the celery stalks and red onion. Aim for small, consistent pieces for even distribution and texture. You should see vibrant colors ready to mix. Add the chopped celery and onion to the bowl with the flaked tuna.
- Mix It Up (2-3 minutes): Add the mayonnaise, bright dill relish, salt, and freshly ground black pepper to the bowl. Stir everything together gently with a spoon until all ingredients are well combined and the mixture looks uniformly creamy. If the mixture seems too dry, stir in an extra tablespoon of mayonnaise until it reaches your desired consistency. Ensure no dry tuna spots remain.
- Chill & Serve (30 minutes minimum): Cover the bowl tightly with plastic wrap or transfer the tuna salad to an airtight container. Refrigerate for at least 30 minutes to allow the flavors to meld and the salad to chill thoroughly. The flavors will deepen and taste much fresher after this short rest. For a quicker lunch, you can serve immediately on your favorite toasted bread.
Quick Prep Hacks & Troubleshooting
Make your subway tuna recipe Bright Dill Relish even easier and troubleshoot common issues:
- Speedy Prep: Use pre-chopped celery or pre-made bright dill relish for quick meals.
- Smoother Texture: Pulse tuna and veggies briefly in a food processor for a very smooth salad (don’t overmix!).
- Flavor Adjustments: Add a pinch more salt or a squeeze of lemon juice if bland. Stir in extra bright dill relish for more tang.
Perfect Occasions & Serving Inspiration
This subway tuna recipe Bright Dill Relish fits many family meal plans. It’s versatile for quick, satisfying dishes.
- Quick Dinners: Pair with a green salad.
- Easy Lunches: Great for sandwiches or wraps.
- Potlucks: Serve as a delightful dip.
- Packed Lunches: Excellent for meal prep.
Pairing & Storage Tips
- Sides: Crackers, toasted bread, veggie sticks.
- Drinks: Lemonade, iced tea, sparkling water.
- Make-ahead: 1-2 days in advance.
- Storage: Airtight, fridge, 3-4 days. Not freezer-friendly.
Nutrition & Lifestyle Advantages of subway tuna recipe Bright Dill Relish
Beyond taste, this subway tuna recipe Bright Dill Relish offers healthy lifestyle benefits. It’s a powerhouse for nutritious family meals.
- High-Protein: Tuna is a lean protein.
- Quick Meal Prep: Streamlined lunches.
- Balanced Meals: Combine with whole grains/veggies.
Core Benefits
- Energy: Protein keeps you full.
- Omega-3s: Good for heart and brain.
- Family-Friendly: Classic flavor for all.
- Budget-Friendly: Economical pantry staple.
Everyday Practical Benefits
Making this tuna relish brings practical advantages, simplifying healthy eating choices.
- Convenience: Fast to assemble, minimal cleanup.
- Budget: Affordable staples, cost-effective.
- Nutrition: Great protein for balanced meals.
Achieve Your Goals
- “Save Time:” Ready in under 15 minutes.
- “Feed Family:” Hearty, satisfying meal.
- “Stick to Budget:” Delicious, inexpensive.
Expert Tips, Variations & Adjustments
Elevate your homemade tuna relish with these tricks. When I’m serving this for a quick lunch, I sometimes warm the tuna mixture slightly before adding it to toasted bread; it adds a comforting touch.
- Pro Tricks: Toast bread. Garnish with dill/paprika.
- Customization: Add cayenne, lemon juice, or fresh parsley.
- Allergy Swaps: Egg-free mayo or lettuce wraps.
Common Questions Answered
Is subway tuna recipe Bright Dill Relish good for meal prep?
Yes, this subway tuna recipe Bright Dill Relish is excellent for meal prep. Flavors meld beautifully as it chills. Prepare a batch for delicious, high-protein lunches ready for several days.
What are the healthiest substitutes for subway tuna recipe Bright Dill Relish?
Lighten this subway tuna recipe Bright Dill Relish by swapping mayo for Greek yogurt. Boost nutrition by adding more fresh veggies. Serve over mixed greens for a healthier twist.
Can I order subway tuna recipe Bright Dill Relish ingredients online?
Absolutely! Ingredients for this subway tuna recipe Bright Dill Relish are readily available for online grocery delivery. Find tuna, mayo, and relish through major online services for convenient meal planning.
How long does homemade subway tuna recipe Bright Dill Relish last?
Stored in an airtight container, your homemade subway tuna recipe Bright Dill Relish stays fresh for 3 to 4 days in the refrigerator. Keep it chilled for quality, perfect for grab-and-go meals.
What kind of tuna is best for this subway tuna recipe Bright Dill Relish?
For creamy texture in your subway tuna recipe Bright Dill Relish, I find chunk light tuna in water is best. Albacore works for milder taste. Always drain tuna very well!
Can I make this subway tuna recipe Bright Dill Relish dairy-free?
Yes, easily! Choose a high-quality dairy-free mayonnaise alternative, widely available. Other ingredients are naturally dairy-free, making this a simple swap.
This subway tuna recipe Bright Dill Relish is the ultimate easy, flavorful, family-friendly meal, bringing deli quality home without the fuss. I know your family will truly enjoy this satisfying option! Give this recipe a try this week and save it to your Pinterest board for future quick meal inspiration.
Print
subway tuna recipe Bright Dill Relish
- Total Time: 45 minutes
- Yield: 4 servings
- Diet: General
Description
This easy Subway-style tuna recipe offers a creamy, tangy, and zesty deli flavor perfect for a quick, high-protein lunch or snack. It’s a budget-friendly and satisfying meal, ideal for meal prepping for busy weekdays.
Ingredients
- 2x 5-oz (142 g) cans canned tuna, packed in water, drained
- 0.5 cup (120 g) mayonnaise
- 2 stalks celery, finely chopped (about 0.5 cup (60 g))
- 0.25 small red onion, finely diced (about 0.25 cup (30 g))
- 0.25 cup (60 g) bright dill relish
- 0.25 tsp salt, or to taste
- 0.125 tsp black pepper, freshly ground, or to taste
Instructions
- Drain Tuna: Thoroughly drain the canned tuna using a fine-mesh sieve or by pressing the lid against the can. Ensure it is quite dry. Flake the drained tuna into a medium mixing bowl with a fork, breaking up any large chunks.
- Prep Vegetables: Finely chop the celery stalks and red onion, aiming for small, consistent pieces for even distribution and texture. Add the chopped celery and onion to the bowl with the flaked tuna.
- Combine Ingredients: Add the mayonnaise, bright dill relish, salt, and freshly ground black pepper to the bowl. Stir everything together gently with a spoon until all ingredients are well combined and the mixture looks uniformly creamy. (If the mixture seems too dry, stir in an extra tablespoon of mayonnaise until it reaches your desired consistency.)
- Chill and Serve: Cover the bowl tightly with plastic wrap or transfer the tuna salad to an airtight container. Refrigerate for at least 30 minutes to allow the flavors to meld and the salad to chill thoroughly. (For a quicker lunch, you can serve immediately on your favorite toasted bread.)
Notes
Ensure tuna is well-drained to prevent a watery salad. For best crunch, use crisp celery, and for brighter flavor, consider fresh dill. Always taste and adjust seasonings (salt, pepper, relish) before serving. For quicker prep, use pre-chopped ingredients. If you prefer a smoother texture, briefly pulse the tuna and vegetables in a food processor (avoid overmixing). If bland, add a pinch more salt or a squeeze of lemon juice.
- Prep Time: 15 minutes
- Cook Time: 0 minutes
- Category: Lunch, Salad
- Method: No-Cook
- Cuisine: American
Nutrition
- Serving Size: 0.75 cup (180 g)
- Calories: 290 calories
- Sugar: 2 g
- Sodium: 430 mg
- Fat: 20 g
- Saturated Fat: 3 g
- Unsaturated Fat: 17 g
- Trans Fat: 0 g
- Carbohydrates: 5 g
- Fiber: 1 g
- Protein: 16 g
- Cholesterol: 58 mg
FREE PRINTABLE RECIPE
Get the Printable Recipe PDF (Free)
Enter your email and we’ll send you the ingredients + step-by-step instructions as a clean PDF you can save to your phone.
- ✅ Printable PDF (ingredients + steps)
- ✅ Save it to your phone (no long scrolling)
- ✅ Includes cook time + servings
- ✅ Easy to follow
FAQ
Where’s the full recipe?
It’s delivered as a printable PDF so you can save it and cook without scrolling.
I didn’t get the email.
Check Spam/Promotions and search your inbox for your site name. Then click Confirm to receive the PDF.