
Oh, how I adore the magic of a no-bake treat, especially when it delivers such incredible flavor and texture! This classic nanaimo bars recipe With Cocoa Top Gloss is famous for its distinct layers: a rich, crumbly base, a smooth, creamy custard, and that irresistible, shiny chocolate topping. It’s a truly family-friendly dessert that skips the oven, making it perfect for busy evenings or when you need an easy dinner idea for something sweet. I often whip up a batch on a Sunday afternoon to have treats ready for the week.
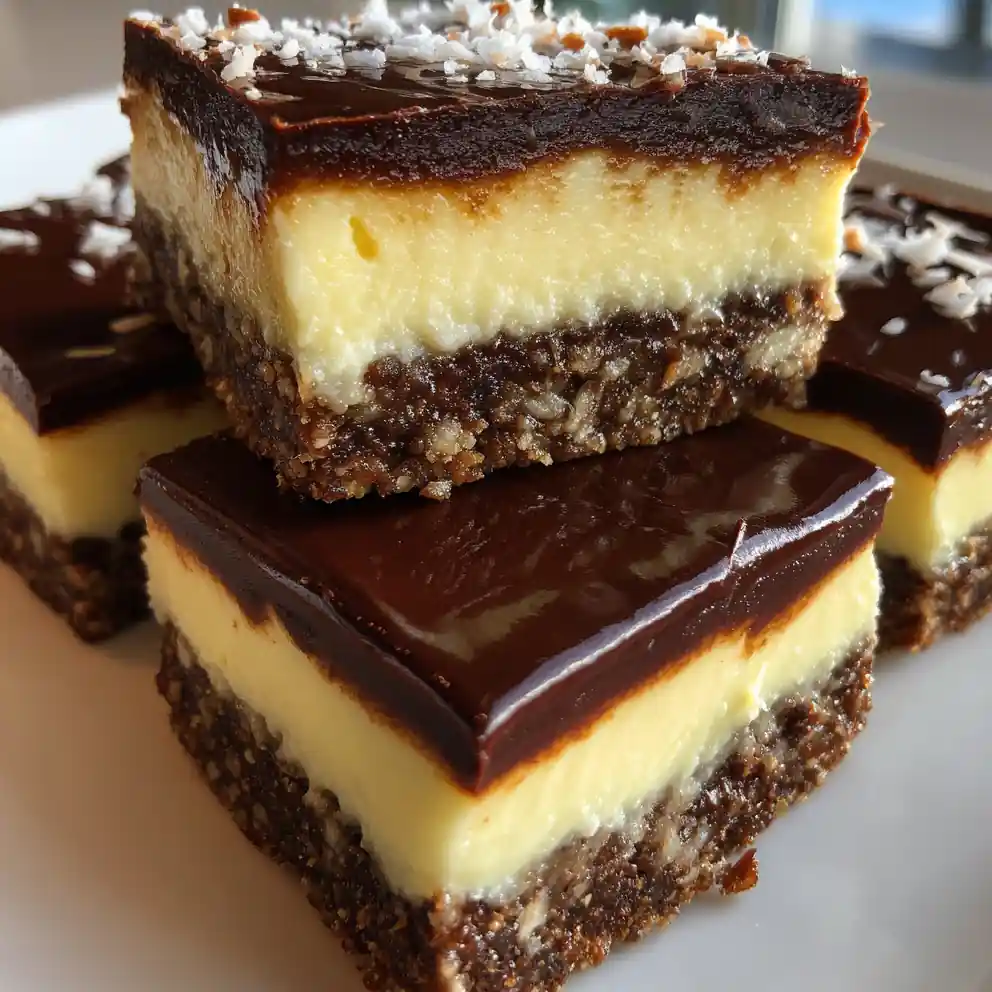
Ingredient Essentials and Smart Upgrades
Crafting the perfect nanaimo bars begins with understanding each layer’s role. From the rich, dense base to the glossy chocolate finish, every ingredient matters for an authentic taste and texture.
- Unsalted Butter: 1/2 cup (113g) for the base, melted; 1/2 cup (113g) for the filling, softened; 2 tablespoons (28g) for the gloss, melted. (Provides richness and binds ingredients. Use organic butter for premium quality.)
- Granulated Sugar: 1/4 cup (50g). (Sweetens the base.)
- Unsweetened Cocoa Powder: 1/4 cup (25g). (Deep chocolate flavor for the base. High-quality dark cocoa elevates richness.)
- Large Egg: 1, lightly beaten. (Essential binder for the base, ensures it sets correctly.)
- Graham Cracker Crumbs: 2 cups (200g). (The foundational texture of the base. For a low-sugar option, look for reduced-sugar graham crackers.)
- Shredded Unsweetened Coconut: 1 cup (90g). (Adds chewiness and a subtle tropical note to the base.)
- Custard Powder: 2 tablespoons (15g). (Key to the classic Nanaimo bar custard flavor and creamy texture. Find it in the baking aisle.)
- Powdered Sugar: 2 cups (240g). (Creates a smooth, stable, and sweet custard filling.)
- Heavy Cream: 2-3 tablespoons (30-45ml). (Adds luxurious creaminess to the filling. You can use half-and-half if that’s what’s in the fridge for a slightly lighter touch.)
- Baking Chocolate: 4 ounces (115g) semi-sweet or bittersweet, chopped. (For the decadent cocoa top gloss. Premium baking chocolate offers the best melt and shine.)
For best results, ensure your butter is fresh and your custard powder hasn’t expired. Unsweetened shredded coconut is always preferred to avoid overly sweet bars.
Easy Cooking Instructions, Step by Step
Creating this classic nanaimo bars recipe With Cocoa Top Gloss is straightforward with these steps. Pay attention to chilling times – they’re key for perfect layers.
- Prep the Base: In a medium saucepan, melt 1/2 cup butter, granulated sugar, and cocoa powder over low heat until smooth and shimmering, about 3-4 minutes. Remove from heat. Whisk in the lightly beaten egg quickly until thickened slightly, about 1 minute, preventing it from scrambling. Stir in graham cracker crumbs and shredded coconut until well combined. I often use a food processor to blitz the graham crackers for an extra-fine crumb, which makes for a smoother base and a quicker prep for this family-friendly treat. Press this mixture firmly and evenly into an 8×8 inch pan lined with parchment paper, allowing an overhang for easy removal. Chill in the refrigerator for at least 30 minutes until firm to the touch.
- Whip the Custard Layer: In a mixing bowl, beat 1/2 cup softened butter until creamy, about 2 minutes. Gradually add custard powder, powdered sugar, and 2 tablespoons of heavy cream, beating until light, fluffy, and smooth, about 3-5 minutes. If it looks dry, add the remaining tablespoon of cream. If your custard mixture seems a little too soft after beating, gradually add 1-2 tablespoons more powdered sugar until it holds its shape. Spread this creamy filling evenly over the chilled base. Chill again in the refrigerator for at least 1 hour, or until firm.
- Create the Cocoa Top Gloss: In a heatproof bowl set over a saucepan of simmering water (a double boiler), gently melt the chopped baking chocolate and 2 tablespoons of butter together, stirring occasionally until smooth and glossy, about 5-7 minutes. Ensure no water gets into the chocolate.
- Chill and Cut: Pour the warm (not hot!) chocolate gloss evenly over the chilled custard layer, tilting the pan gently to spread it to the edges. Ensure the gloss is smooth and covers the entire surface for a beautiful finish. Chill the nanaimo bars recipe With Cocoa Top Gloss for at least 2-3 hours, or preferably overnight, until completely firm. For clean edges, use a sharp knife warmed under hot water and wipe it clean between each cut. This prevents crumbling.
Perfect Occasions and Make-Ahead Uses
These no-bake bars are incredibly versatile, ideal for holiday platters, family potlucks, or birthdays. This nanaimo bars recipe With Cocoa Top Gloss is a cherished classic for Canadian Thanksgiving or Christmas dessert tables.
Serve them with hot coffee, tea, or cold milk. They’re a complete treat, needing no other sides.
This nanaimo bars recipe With Cocoa Top Gloss is excellent for make-ahead dessert prep. Store squares in an airtight container, separated by parchment, in the fridge for up to a week.
Freeze individual squares for up to 2-3 months. Thaw in the fridge or at room temperature for a quick treat.
Wellness and Lifestyle Highlights of Nanaimo Bars
While undoubtedly a rich indulgence, a small square from this nanaimo bars recipe With Cocoa Top Gloss offers a comforting, homemade alternative to highly processed store-bought desserts. It’s a satisfying treat that effectively curbs a sweet craving.
- A truly family-friendly indulgence, perfect for sharing at gatherings.
- Provides a satisfying sweet treat that feels special and celebratory.
- Delivers a delightful blend of textures from the crumbly base to the creamy filling and rich chocolate top.
- This classic dessert creates memorable family moments and a satisfying sweet indulgence for any day.
Everyday Value and Practical Benefits
This dessert works wonderfully for busy households because no baking is required, making it a breeze to prepare. This is especially convenient on hot days or when your oven space is already occupied with other dishes. It’s also simple to scale the recipe to suit different crowd sizes.
- Prepared with common pantry staples, this recipe is often more economical than buying pre-made desserts.
- Ingredients are readily sourced from most grocery stores.
- Offers flexibility for last-minute dessert needs with minimal fuss.
The individual squares are excellent for lunch boxes as a special treat, easy to bring to a friend’s house as a thoughtful gift, or simply keep a stash for personal enjoyment. They’re a fantastic addition to any family dinner.
Expert Tips, Adjustments, and Safety Notes
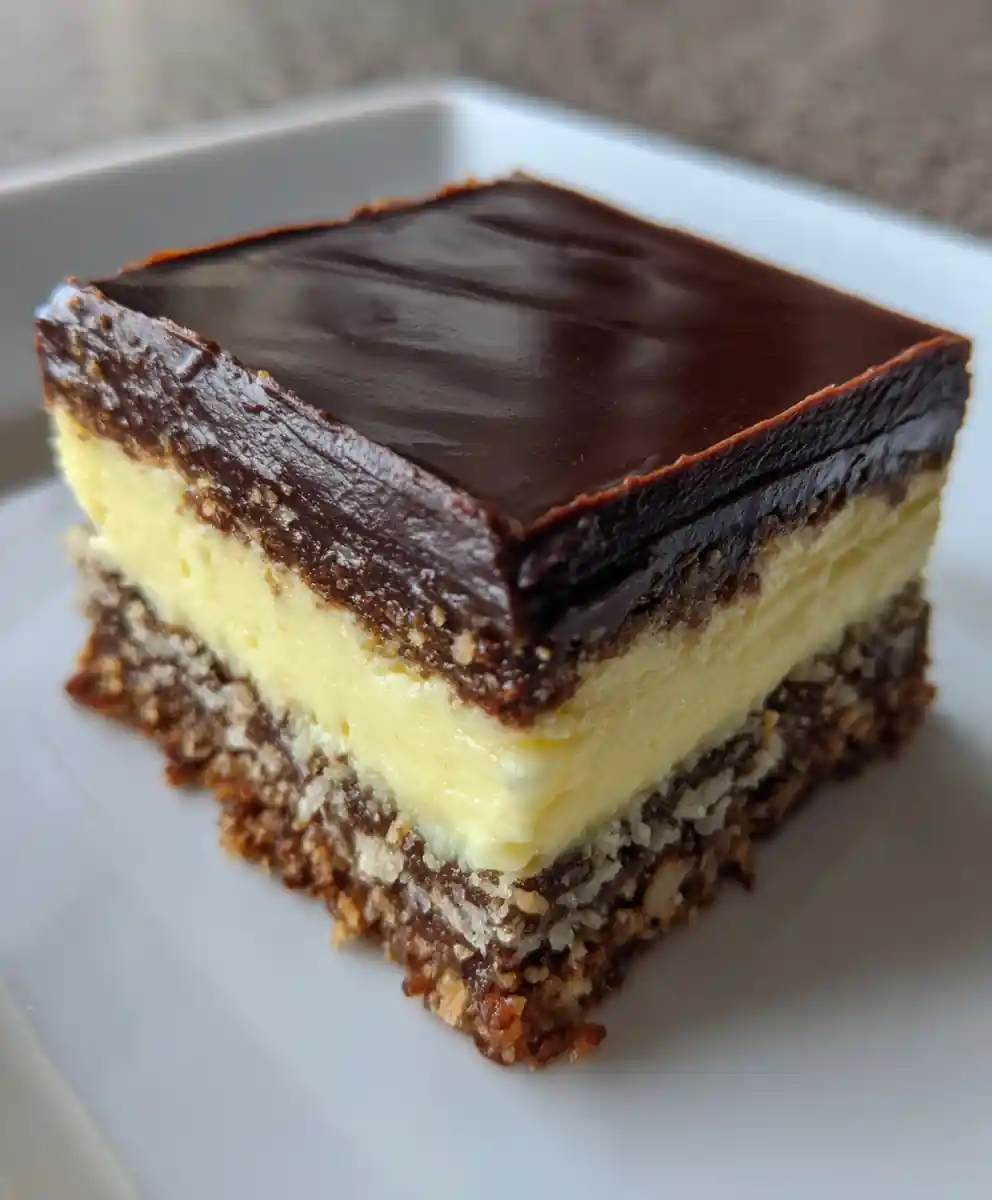
For a truly glossy top from this nanaimo bars recipe With Cocoa Top Gloss, ensure your melted chocolate and butter mixture isn’t too hot when pouring it over the chilled custard. A slightly cooled mixture will set more smoothly. I’ve found that using a warm, sharp knife makes all the difference for getting clean, crisp edges when cutting the bars.
To enhance the flavor, consider adding a tiny pinch of fine sea salt to the base mixture or a quarter teaspoon of pure vanilla extract to the custard filling for extra depth.
For those avoiding gluten, simply use gluten-free graham crackers to adapt this nanaimo bars recipe With Cocoa Top Gloss. If you need a dairy-free version, substitute dairy-free butter and cream alternatives, keeping in mind the texture might vary slightly from the traditional recipe.
FAQs
Is this nanaimo bars recipe with cocoa top gloss suitable for meal prep and freezing?
Absolutely! These bars are ideal for making ahead and freeze beautifully for up to 3 months. Just thaw them in the fridge before serving for the best texture. They’re a convenient sweet treat for future enjoyment.
How long do nanaimo bars stay fresh in the fridge?
When stored in an airtight container, these delicious bars stay fresh for up to one week in the refrigerator. Layering them with parchment paper can prevent sticking and maintain their appearance.
Can I make nanaimo bars without eggs?
The egg in the base helps bind the graham cracker crumbs and coconut, contributing to the classic texture. While some variations exist without it, for a truly authentic experience with this nanaimo bars recipe With Cocoa Top Gloss, it’s recommended to include it and ensure it’s tempered correctly.
What type of chocolate is best for the cocoa top gloss?
Semi-sweet or bittersweet baking chocolate works best for creating a rich, firm, and beautifully glossy top. While chocolate chips can be used, they may contain stabilizers that result in a softer or less glossy finish.
How do I prevent my Nanaimo bars from crumbling when cut?
Ensure the bars are thoroughly chilled, ideally overnight, to allow all layers to set completely. I always use a hot, sharp knife and wipe it clean between each cut; this trick makes for the cleanest, most perfect slices every time.
Can I make a lighter version of this nanaimo bars recipe?
You can try reducing the sugar slightly in each layer or using low-fat graham crackers for a lighter option. Bear in mind that these adjustments will alter the traditional texture and richness somewhat, but still yield a delightful treat.
Where can I find custard powder for this recipe?
Custard powder is a common ingredient and is typically found in the baking aisle of most major grocery stores. Look for it near puddings, gelatin, or other baking mixes.
How to make nanaimo bars kid-friendly?
This nanaimo bars recipe With Cocoa Top Gloss is naturally kid-friendly! For younger palates, you might consider substituting part of the semi-sweet chocolate with milk chocolate in the cocoa top gloss to create a slightly milder flavor profile that children often prefer.
Conclusion
This classic nanaimo bars recipe With Cocoa Top Gloss truly delivers a perfect balance of textures and flavors, proving that the best desserts don’t always need an oven. It’s a wonderful addition to your family dinners and an easy dessert solution. Whip up a batch this week, share your delicious creations, and don’t forget to save this recipe to your Pinterest for your next sweet craving!
Print
nanaimo bars recipe With Cocoa Top Gloss
- Total Time: 251 minutes
- Yield: 16 bars
- Diet: General
Description
This classic Nanaimo bars recipe features three distinct layers: a rich, crumbly chocolate base, a smooth, creamy custard filling, and an irresistible, shiny chocolate topping. It is a family-friendly no-bake dessert, perfect for easy sweet treats that skip the oven.
Ingredients
- 0.5 cup (113g) unsalted butter, melted (for base)
- 0.5 cup (113g) unsalted butter, softened (for filling)
- 2 tablespoons (28g) unsalted butter, melted (for gloss)
- 0.25 cup (50g) granulated sugar
- 0.25 cup (25g) unsweetened cocoa powder
- 1 large egg, lightly beaten
- 2 cups (200g) graham cracker crumbs
- 1 cup (90g) shredded unsweetened coconut
- 2 tablespoons (15g) custard powder
- 2 cups (240g) powdered sugar
- 2–3 tablespoons (30-45ml) heavy cream
- 4 ounces (115g) semi-sweet or bittersweet baking chocolate, chopped
Instructions
- Prep Base Layer: In a medium saucepan, melt 0.5 cup butter, granulated sugar, and cocoa powder over low heat for 3-4 minutes until smooth. Remove from heat and quickly whisk in the lightly beaten egg for about 1 minute until slightly thickened. Stir in graham cracker crumbs and shredded coconut until well combined. Press this mixture firmly into an 8×8 inch pan lined with parchment paper. Chill in the refrigerator for at least 30 minutes until firm.
- Whip Custard Filling: In a mixing bowl, beat 0.5 cup softened butter until creamy (about 2 minutes). Gradually add custard powder, powdered sugar, and 2 tablespoons of heavy cream, beating for 3-5 minutes until light, fluffy, and smooth. Add the remaining tablespoon of cream if the mixture is dry; add 1-2 tablespoons more powdered sugar if too soft. Spread this filling evenly over the chilled base. Chill again for at least 1 hour, or until firm.
- Create Chocolate Gloss: In a heatproof bowl set over simmering water (double boiler), gently melt the chopped baking chocolate and 2 tablespoons butter, stirring occasionally, for 5-7 minutes until smooth and glossy. Ensure no water enters the chocolate.
- Chill and Cut Bars: Pour the warm (not hot) chocolate gloss evenly over the chilled custard layer, tilting the pan gently to spread to the edges. Chill the bars for at least 2-3 hours, or preferably overnight, until completely firm. For clean edges, use a sharp knife warmed under hot water and wipe it clean between each cut.
Notes
For best results, ensure your butter is fresh and custard powder is not expired. Unsweetened shredded coconut is preferred to avoid overly sweet bars. Whisk the egg quickly into the base mixture to prevent scrambling. For a smoother base, blitz graham crackers in a food processor for extra-fine crumbs. If the custard filling seems too soft, gradually add 1-2 tablespoons more powdered sugar until it holds its shape. For clean edges when cutting, use a sharp knife warmed under hot water and wipe it clean between each cut.
- Prep Time: 30 minutes
- Cook Time: 11 minutes
- Category: Dessert
- Method: No-Bake, Chilling
- Cuisine: Canadian
Nutrition
- Serving Size: 1 bar (approx. 45g)
- Calories: 350 calories
- Sugar: 50 g
- Sodium: 120 mg
- Fat: 22 g
- Saturated Fat: 14 g
- Unsaturated Fat: 5 g
- Trans Fat: 0 g
- Carbohydrates: 45 g
- Fiber: 2 g
- Protein: 4 g
- Cholesterol: 60 mg
FREE PRINTABLE RECIPE
Get the Printable Recipe PDF (Free)
Enter your email and we’ll send you the ingredients + step-by-step instructions as a clean PDF you can save to your phone.
- ✅ Printable PDF (ingredients + steps)
- ✅ Save it to your phone (no long scrolling)
- ✅ Includes cook time + servings
- ✅ Easy to follow
FAQ
Where’s the full recipe?
It’s delivered as a printable PDF so you can save it and cook without scrolling.
I didn’t get the email.
Check Spam/Promotions and search your inbox for your site name. Then click Confirm to receive the PDF.