
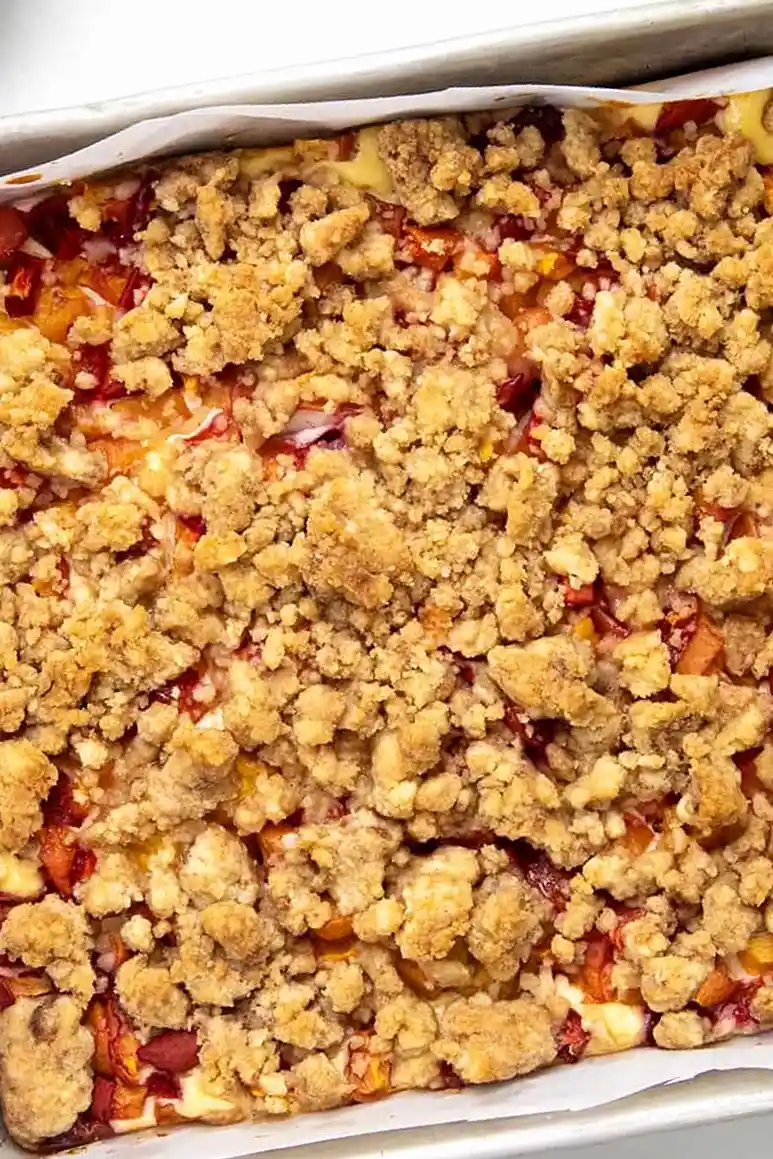
Experience the perfect blend of a fruity cobbler and a creamy cheesecake in every bite. These bars feature a buttery crust, a rich filling, and a crunchy cinnamon topping.
List of ingredients
- 1 ½ cups (126 g) graham cracker crumbs (about 10-12 crushed sheets) – for a sturdy, buttery base.
- 6 tablespoons unsalted butter, melted – binds the crust together.
- ¼ cup (50 g) granulated sugar – adds sweetness to the base.
- 2 packages (8 ounces each) cream cheese, room temperature – provides the creamy core.
- 2 large eggs, room temperature – stabilizes the cheesecake filling.
- ⅓ cup (67 g) granulated sugar – sweetens the cream cheese layer.
- 1 teaspoon vanilla extract – enhances the overall flavor profile.
- ¼ teaspoon kosher salt – balances the sweetness.
- 2 cups (332 g) diced peaches (fresh or frozen, thawed if frozen) – provides the fruit layer.
- ¾ cup (94 g) all-purpose flour – creates the structure for the crumble.
- ¼ cup (50 g) light brown sugar, packed – gives the topping a rich, molasses taste.
- 1 teaspoon cinnamon – adds warmth and cobbler flavor.
- ¼ teaspoon kosher salt – enhances the cinnamon and sugar.
- 5 tablespoons unsalted butter, melted – creates the crumbly topping texture.
step-by-step instructions
- Prepare the Pan: Preheat your oven to 350°F (177°C). Line a 9×9-inch baking dish with parchment paper, ensuring it overhangs the sides for easy removal.
- Create the Crust: Stir together graham cracker crumbs, melted butter, and sugar in a medium bowl until it looks like wet sand. Press the mixture evenly into the bottom of the prepared pan.
- Mix the Filling: Use a hand mixer in a large bowl to beat the room temperature cream cheese, eggs, sugar, vanilla, and salt until the texture is completely smooth. Spread this filling evenly over the crust.
- Add the Fruit: Scatter the diced peaches evenly across the top of the cheesecake layer.
- Make the Crumble: Whisk flour, brown sugar, cinnamon, and salt in a medium bowl. Stir in the melted butter until the mixture becomes crumbly.
- Top and Bake: Sprinkle the crumble topping evenly over the peaches. Bake for 35-40 minutes, or until the filling is set.
- Cool and Chill: Transfer the pan to a wire rack and cool completely for about 1 hour. Refrigerate for at least 1 hour, or until fully chilled.
- Slice and Serve: Lift the bars out of the pan using the parchment paper overhang. Slice into squares and serve.
Optimizing Ingredient Quality
Achieving a Uniform Crust Texture
Ensure the graham cracker crumbs are thoroughly coated in melted butter before pressing them into the pan. This prevents the crust from becoming too dry or crumbling apart when you slice the bars. Using a flat-bottomed cup to press the mixture ensures a level base.
Ensuring Smooth Cream Cheese Filling
Allow your cream cheese and eggs to reach room temperature before mixing to avoid lumps. If you are short on time, place the wrapped cream cheese in warm water for 15 minutes. Avoid over-mixing after adding eggs to prevent air bubbles from forming in the bake.
Preparing Peaches for Maximum Stability
If using frozen peaches, ensure they are completely thawed and patted dry with paper towels. Excess moisture from frozen fruit can seep into the cheesecake layer, making it too soft. Fresh peaches should be diced into uniform pieces for even distribution.
Balancing the Cinnamon Crumble
Whisk the flour, cinnamon, and salt together before adding the brown sugar and melted butter. This ensures the cinnamon is distributed evenly and prevents salty or spicy clumps. The resulting texture should be pebbly rather than a smooth paste.
Ingredient Substitutions and Variations
Alternative Crust Options
You can replace graham cracker crumbs with crushed vanilla wafers or a shortbread cookie mixture. Keep the amount of melted butter and sugar the same to maintain the crust’s structural integrity. These alternatives offer a slightly different flavor profile while keeping the same texture.
Using Canned Peaches effectively
Canned peaches can be used if fresh or frozen options are unavailable. Drain them thoroughly in a colander and pat them dry with paper towels to remove excess syrup. Dice them into small pieces to ensure they integrate well with the crumble topping.
Swapping Fruits for Seasonal Changes
This recipe works well with other diced fruits like nectarines, apples, or berries. For berries, ensure they are drained well, especially if using frozen varieties, to avoid a watery filling. Apples may require a slightly longer bake time if they are not pre-cooked.
Adjusting the Sweetener
For a deeper flavor in the crumble, you can use dark brown sugar instead of light brown sugar. In the crust, honey can be substituted for sugar, though you may need to adjust the butter amount slightly to prevent the base from becoming too sticky.
Baking and Doneness Techniques
Using a Food Thermometer for Accuracy
The most reliable way to check if the cheesecake layer is set is using an instant-read thermometer. The center should reach an internal temperature of 150°F to 155°F. This prevents the bars from being underbaked while avoiding the dryness of overbaking.
Identifying Visual Cues of Readiness
Look for the crumble topping to turn a golden brown color as the primary sign of doneness. The edges of the cheesecake should be slightly puffed and set, while the center should have a very slight jiggle. The crumble should look toasted and crisp.
Preventing Topping Burn
If the cinnamon crumble begins to brown too quickly before the center is set, cover the pan loosely with aluminum foil. This protects the top from direct heat while allowing the interior to finish cooking. Check the internal temperature every 5 minutes once covered.
Maintaining Filling Consistency
Avoid over-beating the cheesecake batter once the eggs are added, as this incorporates too much air. Excess air can cause the cheesecake to rise rapidly in the oven and then collapse, creating cracks. Use a low to medium speed on your mixer.
Cooling and Setting Guidelines
The Role of Room Temperature Cooling
Allow the bars to cool on a wire rack for at least one hour before moving them to the fridge. This prevents the bottom crust from steaming and becoming soggy. Cooling slowly also helps the internal structure of the cheesecake stabilize.
Maximizing Stability via Refrigeration
Chill the bars for a minimum of one hour, though overnight is ideal for the best results. Cold temperatures firm up the fats in the cream cheese and butter, making the bars easier to slice. This process ensures the layers remain distinct and clean.
Utilizing Parchment Overhang
Always leave a few inches of parchment paper hanging over the sides of the baking dish. This allows you to lift the entire block of bars out of the pan without damaging the edges. It is much safer than trying to slice the bars while they are still in the dish.
Tips for Clean Slicing
Use a sharp chef’s knife dipped in hot water to cut the bars. Wipe the knife clean with a damp cloth between every single slice. This prevents the cheesecake from sticking to the blade and ensures sharp, professional edges.
Storage and Preservation
Refrigeration Best Practices
Store the bars in an airtight container in the refrigerator for up to 3 to 4 days. Covering them tightly prevents the cheesecake from absorbing odors from other foods in the fridge. Keep them away from strong-smelling items like onions or garlic.
Flash Freezing for Easy Storage
To freeze sliced bars without them sticking together, place them on a plate and freeze uncovered for one hour. Once they are firm, wrap each bar individually in plastic wrap. This makes it easy to remove only the amount you need for serving.
Long-Term Freezer Packaging
Place the individually wrapped bars into a heavy-duty freezer bag and seal it tightly. Label the bag with the date, as these bars maintain their quality for up to 3 months. Double-wrapping helps prevent freezer burn on the crumble topping.
Correct Thawing Methods
Thaw frozen cheesecake bars slowly in the refrigerator overnight. Avoid using a microwave to thaw them, as the uneven heat can melt the cream cheese and ruin the texture. Letting them reach room temperature slowly preserves the integrity of the layers.
Troubleshooting Common Issues
Fixing Lumpy Cheesecake Batter
If you find lumps in your batter despite using room temperature ingredients, pass the mixture through a fine-mesh sieve. Alternatively, use a whisk to manually smooth out the lumps before spreading the filling. This ensures a professional, silky mouthfeel.
Managing Excess Fruit Moisture
If your peaches are exceptionally juicy, toss the diced pieces in a teaspoon of cornstarch before adding them to the bars. The cornstarch absorbs the extra liquid during baking and turns it into a thick glaze. This prevents the cheesecake layer from becoming soggy.
Preventing a Crumbly Base
If the crust feels too loose, press it more firmly into the pan using the bottom of a flat measuring cup. Ensure the melted butter has fully coated every crumb before pressing. You can also bake the crust for 5 minutes alone before adding the filling for extra stability.
Avoiding a Soggy Crumble
Ensure the crumble topping is not piled too thickly in one area, which can trap moisture from the peaches. Spread the topping evenly across the surface. If the topping feels soft after cooling, a brief 5-minute toast in a warm oven can crisp it back up.
Serving and Presentation
Enhancing with Fresh Cream
Add a dollop of stabilized whipped cream to the top of each bar just before serving. The lightness of the cream provides a beautiful contrast to the density of the cheesecake. A sprinkle of cinnamon on the cream adds a nice finishing touch.
Pairing with Ice Cream
Serve the chilled bars alongside a scoop of warm vanilla bean ice cream for a temperature contrast. The melting ice cream mimics the experience of a traditional warm peach cobbler. This is especially effective when serving the bars at a summer gathering.
Professional Plating Tips
Arrange the sliced bars on a white platter to make the colors of the peaches and golden crumble pop. Garnish the platter with fresh mint leaves and a few fresh peach slices for a fresh look. Dust the edges of the plate with a light coating of powdered sugar.
Serving for Crowd Control
For large parties, pre-slice the bars into smaller, bite-sized rectangles. Use small dessert napkins or decorative paper liners for each piece. This makes them easier for guests to eat while standing and mingling.
Frequently Asked Questions
Can I use a different size pan?
You can use a different pan, but it will change the thickness and baking time. A smaller pan will create thicker bars that need more time in the oven to set. A larger pan will result in thinner bars that may cook faster.
Should I peel the peaches?
Peeling the peaches is optional. If you prefer a smoother texture, remove the skins; however, the skins are edible and add a bit of rustic character to the dessert. The flavor remains the same regardless of whether you peel them.
Can this recipe be made gluten-free?
Yes, replace the graham cracker crumbs with a certified gluten-free alternative and use a 1:1 gluten-free all-purpose flour blend for the crumble. Ensure the flour blend contains xanthan gum to maintain the crumbly texture of the topping.
Why did my cheesecake layer crack?
Cracks are usually caused by over-beating the eggs or baking at too high a temperature. Because these bars have a crumble topping, any surface cracks are hidden from view. To minimize cracking, follow the room temperature guidelines strictly.
Print
Peach Cobbler Cheesecake Bars
- Total Time: 2 hours 50 minutes
- Yield: 9 bars
- Diet: General
Description
These Peach Cheesecake Bars have a buttery graham cracker crust, a creamy cheesecake layer, sweet diced peaches, and a cinnamon crumble topping. Every bite tastes like peach cobbler and cheesecake combined!
Ingredients
- 1 ½ cups (126 g) graham cracker crumbs
- 6 tablespoons unsalted butter, melted
- ¼ cup (50 g) granulated sugar
- 2 packages (8 ounces each) cream cheese, room temperature
- 2 large eggs, room temperature
- ⅓ cup (67 g) granulated sugar
- 1 teaspoon vanilla extract
- ¼ teaspoon kosher salt
- 2 cups (332 g) diced peaches, fresh or frozen (thawed if frozen)
- ¾ cup (94 g) all-purpose flour
- ¼ cup (50 g) light brown sugar, packed
- 1 teaspoon cinnamon
- ¼ teaspoon kosher salt
- 5 tablespoons unsalted butter, melted
Instructions
- Step 1: Preheat the oven to 350°F (177°C). Line a 9×9-inch baking dish with parchment paper, leaving some overhang on the sides for easy removal.
- Step 2: In a medium bowl, stir together the graham cracker crumbs, melted butter, and sugar until the mixture resembles wet sand. Press evenly into the bottom of the prepared pan.
- Step 3: In a large bowl, using a hand mixer, beat cream cheese, eggs, sugar, vanilla, and salt until smooth. Spread the cream cheese filling evenly over the crust.
- Step 4: Evenly scatter the diced peaches over the cream cheese layer.
- Step 5: In a medium bowl, whisk together flour, brown sugar, cinnamon, and salt. Stir in melted butter until crumbly.
- Step 6: Sprinkle the crumble topping evenly over the peaches.
- Step 7: Bake for 35-40 minutes, or until set.
- Step 8: Transfer the pan to a wire rack and let it cool completely, about 1 hour. Then refrigerate for at least 1 hour, or until fully chilled.
- Step 9: Once chilled, lift the bars out of the pan using the parchment overhang. Slice and serve.
Notes
Ensure cream cheese is fully softened to avoid lumps. Fresh, frozen, or well-drained canned peaches can be used. For best results, chill the bars overnight before slicing.
- Prep Time: 15 minutes
- Cook Time: 35 minutes
- Category: Dessert
- Method: Baking
- Cuisine: American
Nutrition
- Serving Size: 1 bar
- Calories: 493 kcal
- Sugar: 32 g
- Sodium: 380 mg
- Fat: 28 g
- Saturated Fat: 16 g
- Unsaturated Fat: 12 g
- Trans Fat: 0 g
- Carbohydrates: 42 g
- Fiber: 2 g
- Protein: 7 g
- Cholesterol: 125 mg